Description Magento1
eKomi Module for Magento allows you to integrate your Magento shop easily with the eKomi system. This allows you to collect verified reviews, display the eKomi seal on your website and get your seller ratings on Google. This helps you increase your website's click-through rates, conversion rates and also, if you are running Google AdWord Campaigns, this helps in improving your Quality Score and hence your costs per click.
The eKomi product review container allows easy integration of eKomi Reviews and ratings into your webshop. It allows you individual positioning of product reviews and includes the Google rich snippet functionality.
Key Features
- Collect order and/or product base Reviews
- Supports Simple, Configurable, Grouped and Bundle products
- Publish reviews on search engines: Google, Bing, Yahoo!
- Easy Integration with eKomi.
- Get Google Seller Ratings.
- Increase the Click-through Rate by over 17%
- Increase Conversion Rate
- Manage Reviews: our team of Customer Feedback Managers reviews each and every review for any terms which are not allowed and also put all negative reviews in moderation.
- Product total reviews
- Product average reviews (star rating)
- List of reviews with pagination and sorting options
- Rating schema for google structured data
- The parent/child products review display
- Multilingual
Compatibility
Magento 1.6.x to 1.9.x.x (tested)
On EE edition it is not tested but it should work on EE 1.1x
Support Php version 5.4 and higherDownload Module
Download zip file
Module Installation
4.1. If you don't have an account with eKomi please register with us from https://store.ekomiapps.de/en/register
4.2. Installation guidesModule Installation (FTP)
- Download the module.
Unzip the file in a temporary directory.
- Upload it to Magento root directory using FTP/SFTP.
- Log in to Admin Panel.
- Navigate to System ⇾ Cache Management and Refresh/Clear the Cache.
Navigate to System ⇾ Configuration ⇾ eKomi Integration and you’ll see the newly installed module.
- Configuration
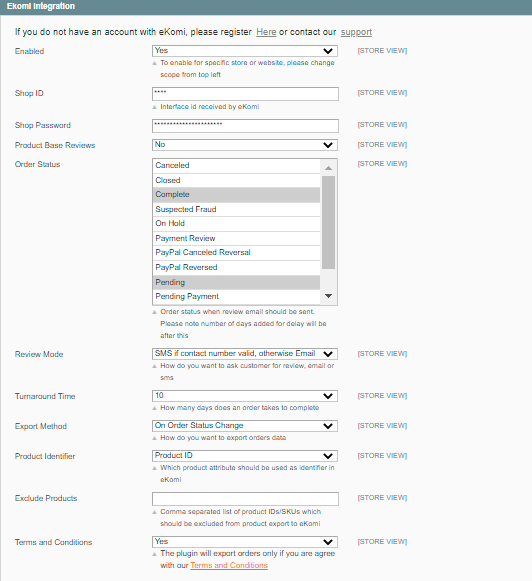
- Navigate to System ⇾ Configuration and click on Ekomi Integration in the left panel
- Configure Ekomi Integration
- Enabled: Set to Yes.
- Shop ID: Enter the Shop ID provided by eKomi.
- Shop Password: Enter the Shop Password/Secret provided by eKomi.
- Product Base Reviews: If enabled, product attributes will also be sent to eKomi
- i.e. Product ID, SKU, Name, Type, Image, and URL
- Order Status: Choose Order Statuses on which you want to export order data to eKomi.
- Review Mode: for SMS, the mobile number format should be according to E164.
- Select Turnaround Time (Order Completion time in days). The turnaround time is a plugin configuration parameter that tells the plugin to check orders that go back that far into the past that match the chosen order state. E.g. you want to send to ekomi all orders that got the status “Order Completion” within the last 10 days, then you set the turnaround time to 10 days.
- Export Method: When do you want to export the orders to eKomi?
- Product Identifier: The attribute you want to use as the identifier in the eKomi system.
- Exclude Products: Comma-separated product IDs/SKUs which should be excluded.
- Terms and Conditions: If enables, then send order to eKomi system otherwise not.
- Save the configuration
Note 2: Please contact support@ekomi.de if you want an opt-in function. - Navigate to System ⇾ Configuration and click on Ekomi Integration in the left panel
Configure Ekomi Product Review Container
- Show the PRC Widget: Set to Yes.
- Widget Token: Enter the Widget Token provided by eKomi.
Note: The eKomi Integration module should be enabled in order to display PRC.
Display Product Review Container:
Show PRC (Admin Panel / Backend)
- Navigate to CMS ⇾ Widgets ⇾ Add New Widget Instance
- Type: eKomi Product Review Container
- Design Package/Theme: Current Theme
- Press Continue
Configure Frontend Properties
- Enter Widget Instance Title, Assign desired store views and set the sort order.
- Enter Widget Instance Title, Assign desired store views and set the sort order.
- Click on Add Layout Update.
- Display On: Select the product page where you want to display the widget.
- Select the Block in which you want to display the widget.
- Save the Widget Instance and the PRC will be displayed on the Store Front.
- Navigate to CMS ⇾ Widgets ⇾ Add New Widget Instance
Show PRC Programmatically
- Open the template in edit mode. Product Template path: app/design/frontend/{Current-Package}/{Current-Theme}/template/catalog/product/view.phtml
Insert the following shortcode in the product page template where you want to display the widget.
<?php echo $this->getLayout()
   ->createBlock('ekomi_ekomiIntegration/PRC')
   ->setTemplate('ekomi/ekomi_sw_prc.phtml')
   ->toHtml();
?>
Module Information
- Maintenance status: Minimally maintained
- Development status: Stable
- Downloads: 500+
- Last modified: 8 Feb 2021
Recommended releases
Version Download Date 3.3.0 zip (25.1 kB) 8th February 2021 3.2.1 zip (24.4 kB) 6 December 2019 3.2.0 zip (27.0 kB) 16 September 2019 3.1.2 zip (26.9 KB) 11 September 2019 3.0.0
zip (23.1 kB)
25 October 2018


Add Comment